Thursday, October 15, 2015

Moda Shuffle Sampler Block Quilt Along begins Nov 1st


JOIN  us Nov 1st as we follow along with Moda's Sampler Block Shuffle. We will post our blocks on Instagram and this blog. Each week Moda will provide 2 -3 free block patterns with tips and teaching tools. Sharpen you skills and techniques.  
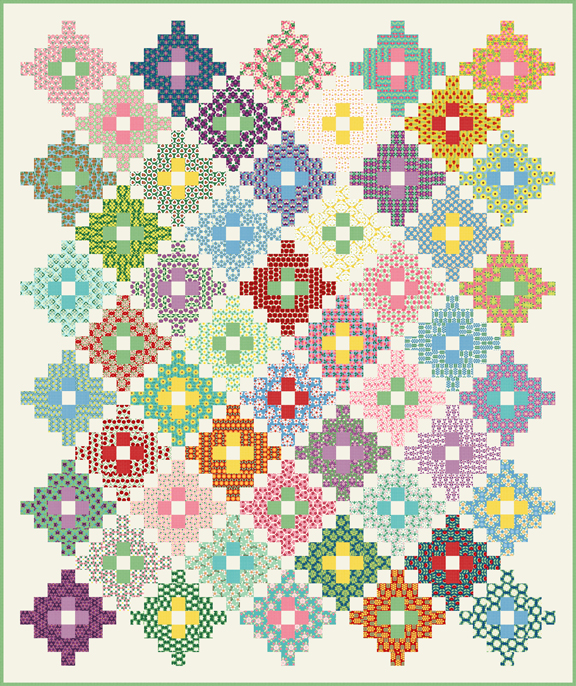
At the finish you will have 30 blocks and 132 Flying Geese  to "shuffle" into a design of your choosing OR to "shuffle" them into an arrangement seen in the quilt shown above.
The arrangement of these blocks and flying geese will be up to you.  
You can "shuffle" them as the quilt  pictured above or come up with your own design.  


We will be offering 5 of the Moda Sampler Block Shuffle Kits with various fabric collections for $88.00.  
Moda sugguests to begin with a Layer Cake, Jelly Roll and a few F8ths or FQ's for variation.  We have put together some collections from different artists.  
Your block kit will include:
Free PDF downloadable patterns each week 
1 Gardenvale Layer Cake or 42 !0" squares
1 Gardenvale Jelly Roll or 40 2.5" strips
$10 worth of additional FQ's or F8's to add to your blocks for variety 


From left to right the collections are:
Miss Kate/Hello Darling, Simply Colorful, Aloha Girl
Joyeux Noel is bottom left and Gardenvale is bottom right


The Moda Sampler Block Shuffle finishing Kit will be $48.13 and will be sold separately. This is for the large setting squares, triangles, borders and binding as seen in the horizontal color block/border stripes as seen in the top picture.  We will offer kits for the Joyeaux Noel, Gardenvale, and the Miss Kate/Hello Darling Collections.  For the Aloha and Simply Colorful kits you will need to purchase your own fabrics.   
Remember to send us pictures of your blocks and we will post them as we sew along. 


 Remember how fun these Quilt Alongs can be?  I just finished the binding on my Apple Pie Quilt.
 I love the cheeriness of this quilt.  I learned so much from sewing each block, putting them on point, and piecing the sashing strips.    The Moda Sampler Shuffle Block quilt will be a fun experience too!


Quilting on the Apple Pie Quilt was done by Leisha Farnsworth.

See you Nov 1st!
Kristin and Sandra

Friday, August 21, 2015

New Quilt Kits and a Flash Sale on select Charm Packs.


America's Garden Quilt features 50 United State Flower Prints
from the Deco State Collection by Tiffany Lerman for In The Beginning Fabrics! 
Finished quilt measures 86.5" x 102.5"

We just have 10 Kits left so reserve yours now.  

Beginning in December America's Garden Pattern will be shipped to you along with the background fabrics, block center fabrics, binding fabric, and the first 10 State Flower prints. 
January-April you will receive 10 new fat eighths each month - one for each new State Flower Print. We will send you an invoice to let you know when they are available. 

December 2015 Starter Kit Shipment:
America's Garden Quilt Pattern
5 1/3 Yards of Background White Pin Dot
Fat Eighth of Red Dots
Fat Eighth of Aqua Dots
1/3 Yard of Yellow Pin Dot for Blocks
1/4 Yard each of Pink Pin Dots, Blue Dots, and Purple Dots for Blocks
1 1/4 Yard of Green Pin Dot for Blocks and Binding
10 Fat Eighths of State Flower Prints


Just In This Week....
Swoon Sixteen Quilt Kits with the Hello Darling fabrics designed by Bonnie and Camille for Moda.


We will be adding 2 extra Fat Quarters of Hello Darling to each kit.  That will give you more fun options for your blocks.  Click here to get your kit now.


FLASH SALE ON CHARM PACKS!  
$6.50 each while supply lasts.


Friday, May 1, 2015

Happy Mother's Day Week


Happy Mother's Day 

to all of you!


Our sweet Mom, Margaret Campbell, taught us to sew at a very young age.  We will always be grateful for her kindness, her example, and her love of creating.   She was pretty amazing. We miss her very much.  We hope you are all able to spend some time with your Mom's or your family for this coming Mother's Day.  Love you Mom!

May 2nd - May 10th enjoy 20% off your total order.  
Use coupon code happymothersday

Sale ends May 11th, 2015


There are some beautiful new bundles at Sisters & Quilters...


Mixologie in Yellow and Gray by Studio M for Moda


Mixologie in Teal and Navy by Studio M for Moda


Singin' the Blues in Blues by Camelot Design Studio


Color Theory Collection in Navy & Teal by V and Co for Moda


Cove Fat Quarter Bundle of 8 in Teal & Taupe Grey by Camelot Design Studio


Clementine Collection in Pink & Green Or in Orange and Teal by Heather Bailey for Free Spirit


Flora by Joel Dewberry for Free Spirit


Daisy by ADORNit


Wanderer Half Yard Bundle of 9 by April Rhodes for Art Gallery


More Hearty Good Wishes by Janet Clare for Moda


Scandi 1 & Scandi 2  by Makower UK for Andover

And we have a few of the Pink Raspberry Sherbet Fat Quarter Bundles left.

And this months Bakers Dozen - Grape Juice!  Yes you asked for some purples.


Just click on our Fat Quarter Bundle links at either shop.  There are many more!


Have a wonderful Mother's Day Week!
Kristin & Sandra

Friday, February 20, 2015

Layer Cake Square Pencil Bag Tutorial


Layer Cake leftovers?  These cute little pencil bags were sewn with 10" layer cake squares - And Mochi Linen by Moda.   We love this strong linen in little bags and totes.    I used a variety of left over layer cake squares or 10" squares.  The ones shown in the tutorial are from Heather Ross's Briar Rose Collection for Windham fabrics.

Have you seen the TOMS pencil bag made from the TOMS flags.  We wanted to make those for our Young Women's 14 year-old Church group this week, but not all of the girls had TOMS flags. So I pulled out the Linen and some left over 10" squares.  Walaaaa.  Cute bags.  They loved them! And they all finished their bags in our hour long meeting.  A perfect way to introduce zippers  to beginning seamstresses.

Actually I love this little bag for much more than pencils.  This will carry all those loose trinkets in my purse.  And you can make it any size you want!


 First cut a 10" square of Mochi Linen.  Here is the link if you are needing to purchase some from our shop.  Match it to a 10" Layer Cake square - with wrong sides together zig zag stitch or serge the outside edges to hold the pieces together and finish off the edges.  I placed a little washable fabric glue (from a glue stick) inside to hold them in place while I stitched around the edges.  This will finish off the edges since this bag will not have a separate lining.

Lay the fabric square down with the outside fabric facing up.  Pin the zipper to the top of the square, matching zipper and fabric edge.  Make sure the zipper is face down - the zipper pull on the underside.  And the zipper pull should be on the left side.  I used a 14" zipper.  You could use a smaller one, but not smaller than 10".
 Note - you can also have the print on the outside-just flip your square.

 Can you see the zipper pull is on the underside?  Very important.  Using your zipper foot, stitch down the zipper.  This is about 1/4" or a titch more from the edge.


 Next, flip the sewn zipper back.  Fold the seam under towards the fabric square.  Top-stitch down the fabric sewing down the seam.  This will keep your fabric from getting caught in the zipper.  I switched the presser foot as you can see.  I did this so that  I have a guide to follow for a straighter top-stitch.  See the finished top-stitching below.  NOTE : For those teaching a youth group, I set up two machines - one with each presser foot.  That way they rotated machines with pinning so there was little wait time.  We finished 8 bags in just a little over an hour.


Click on the picture if you need a close up.  Now we need to do the same stitching on the opposite side of the zipper.


Fold the bottom up to the top of the zipper edge.  Notice the zipper pull is face up and the wrong side of the bag is face up.  Sew along the edge.  This will form a tube when you are finished.


Open up the zipper all the way.  You will need this open to top-stitch this side of the zipper.  Top-stitch the seam down the same distance as your fist top-stitching so they will match when the zipper is closed.

Now you can finish your bag 2 different ways.  For the youth group (and with the TOMS flags) we just needed to sew the seams.  The edges are visible in the inside.  Just follow the next picture.

 If you want to French Seam your bag (raw edges will not show) skip to the French Seam instructions below.

 IMPORTANT Close the Zipper half way.  Next you need to decide if you want a center opening or an opening near to the top.   Center you zipper if you want a center opening.  Pin down edges.  OR...
 if you want a top access opening, position the zipper near the top.  Measure the top and/or bottom of each side to make sure your zipper is straight.
 Pin the zipper edges close together where they are separated.  Did you remember to close your zipper half way?  Stitch about 3/8" from the edge down each side.  Back-stitch at the beginning, the ending, and over the zipper.  I back-stitched over the zipper to strengthen this seam when you turn the bag to the right side.  Trim off excess zipper.

Just turn your bag to the right side.  Push those little corners to a point.  You are Finished!

French Seam Finish Instructions

After closing the zipper part way, turn your bag to the right side.  Position the bag opening where you want it to be.  Stitch a quarter inch seam down each side.  Cut off the excess zipper to be flush with the edges.  Make sure your zipper is close together on the separated side.  As you can see I cut out the zipper coils inside the seam to reduce bulk.  I also clipped the corners so they would be less bulky.

 Turn the bag to the wrong side.  Push out the corners and sides as best you can.  Press the seams flat. Pin where needed.  You are going to stitch a seam down each side.  I recommend 1/2" seam. (3/8" seams are too bulky).

  Just as before, back-stitch the beginning, ending, and over the zipper.  Turn the bag to the right side.


And you are finished.  Can you see the finished seam on the inside?  No raw edges or fraying to deal with.  These little bags should last a long time.

I hope you enjoyed this simple project.   Once you make one, you won't need all the pictures. I love projects that use up scraps of fabric.  If you teach sewing to a youth group, they will love this fun and  easy pencil bag.   Even one of the girls that declared she "didn't sew" loved these bags.

Happy Sewing!  Stay warm!
Kristin and Sandra

Tuesday, February 10, 2015

Words to Live By Block 11


                                             Courage


Another wonderful design!  I love the Laurel wreath pattern with the berries.   I know I am behind schedule...I apologize.  Hopefully I will be caught up tomorrow with Block 12.   My daughter became engaged over the holidays and we have been wedding planning.  We are all so excited.

If you are just joining us, we are making Lisa Bongean's Words to Live By Quilt  - a block each month.  Lisa is the designer of Primitive Gatherings and has hand selected all of the wool and cottons for this BOM kit.  It is not too late to join.  We still have 4 complete kits left!   We are almost finished, but we will leave the hints and pictures up for you.


Lots of small berries and leaves to trace.  I traced the small wool squares with a pencil on my fusible web.  That way I could fit all of the berries inside the small squares.   As you can see I also made good use of the center of the green circular vine.


So I was so careful with my leaves and circular vine when pressing.   Make sure to  "press in place".   Do not "iron" or your leaves and berries will move.  Even a shot of steam can blow off the berries.
The other hint I have for you (which I didn't do) is to take a quick picture with your phone before pressing.  I see now that a few of the leaves are lying closer to the vine than the others.  Had I noticed that before pressing, I would have moved them out just a little. 
I used a pencil to trace some pattern lines on the fabric - just a side of each leaf and the berries.   Also, trace the stems you will need to embroider.  I did this right after inking in the Courage letters, keeping the pattern and fabric in place.  

Happy Sewing

Thursday, November 27, 2014


And to thank each of you, we are having a 

Black Friday to Cyber Monday Sale

20% off your entire order

Use coupon code givethanks at check out

Sale begins today ends Dec 1st at midnight

Friday, November 21, 2014

Words to Live By Block 10

Passion


Passion: a strong feeling of enthusiasm or excitement for something or about doing something...
  
 I think this may also be another word for work.  Except it is work you LOVE.  I think that is how many of us feel about quilting.
  I had an art teacher in college that used to say great art is 1% inspiration and 99% perspiration.   He instructed us to get to know our medium until we really understood it.   
  I have learned so much with this project.  
If you are just joining us, we are making Lisa Bongean's Words to Live By Quilt  - a block each month.  Lisa is the designer of Primitive Gatherings and has hand selected all of the wool and cottons for this BOM kit.  It is not too late to join.  We still have 6 kits left!   


I take pictures of these appliques with the fusible web to help you with the placement.  I hope this is helpful since the camera doesn't always capture the difference in color and pattern.  Watch that oval - the fusible web may come apart as you are cutting the pencil pattern out.  Just re-position it when you press it to the wool.


This block has diamond leaves.  I traced the diamonds in two different patterns so that you could see how much space was left on the wool.  Either way is great.  I did like the nice little squares of wool left over on the right and left  pieces.  I thought the center diagram would be best but that just left me with a long scrap of wool.


I traced the vine lines for the embroidered vines with a sharp pencil.  
This is another block I am looking forward to embroidering - I like the larger pieces.  

Have a Wonderful Thanksgiving next week!