Love Notes Table Topper or Wall Hanging was a fun and quick project. I thought it might be fun to add some pockets to my table topper to tuck valentine notes inside. My husband traveled often years ago and was such a sweetheart - he sent me letters from wherever he traveled. I loved receiving them even though they often came after he had returned home. Thanks honey! My grown children still like receiving Valentines candy with a fun card. So hence....Love Notes
I used one Always & Forever Charm Pack and some additional yardage - 1/8th yard pink swirl, 1/2 yard of Red Love Words, & 1/2 yard of the White w/red Swirls. If you are using fabrics from your stash you will need 5" squares.
I used 1" sashing strips on this quilt and I wish I would have used 1 1/2" because when I pressed the 1/4" seams towards the sashing pieces they were really close.
I cut the outside borders 4" wide x the length. That will make the finished outside borders 3 1/2" wide.
I have enough squares and fabric left to make another one row wall hanging with 3 pockets and one heart square!
The pockets are so so easy to make. Here is a little tutorial if you need it.
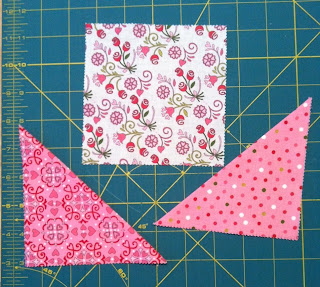
Step 1: Separate your lights and darks from the charm pack. I used the lights for the background and the brights for the hearts and pocket folds. Fold two of the bright 5" squares in half on the diagonal for each pocket you are making. Press.
Step 2 Lay each pressed triangle on the bottom of your light square creating an envelope. I apologize for the blurred image in the top picture!!! Forgive me. I took it with my phone and I don't have another one. :(
Step 3 Baste with machine around the outside edge to keep your triangles in place. I basted just inside the 1/4" seam allowance.
Last step Sew your pocket into your quilt top. The squares are all 5 inches. Decide on your envelope placement ahead of time. Note in this picture that I switched the overlap on the envelope so that the top fold would be on the outside corner. I used 1" sashing strips and I wish I would have used 1 1/2" because when I pressed the 1/4" seams towards the sashing pieces they were really close.
Up close picture of one pocket. Fun huh?
I used a 3 1/4" cookie cutter for my heart pattern. I love this size because I could get two hearts from one charm square if I placed the heart point in the corner of the square when I cut out the heart. I also think you could use some of those funky uneven hearts. Draw your own! I machine appliqued the hearts onto each square. It is much easier to applique the hearts on before you piece your quilt top together!
I think this would be fun to create an envelope for each member of the family and make it into a wall hanging. If you can see in the top right corner a regular sized greeting card fits just fine. You will need to make bigger pockets if you purchase those huge cards! You will need to cut your own squares instead of using a charm pack. NOW its off to the quilter. Yes! I posted this tutorial without having Leisha, my quilter, do her magic because Valentines is just around the corner. I'll post a picture when it is finished. Have fun.
My next project......Hearts Heart Hearts with the fabric collection Little Pink Stars. See last weeks post. Wish me luck! Have a wonderful week!


Soooo cute!! Love the envelope idea!
ReplyDelete