Wednesday, August 29, 2012

Another wonderful sharing day......

Our favorite blogs are customer sharing days.  You will not be disappointed today.  Check out the fun ideas!

Dana of Now and Then Quilts has made some darling quilts out of some of our fabric collections.  This adorable quilt was created with the Daisy Cottage Fabrics and the Riley Blake Chevron.  Don't you love this soft palette? 
There are several beautiful quilts for sale in her shop. 
Another adorable quilt created by Dana featuring the Zoofari fabric collection designed by Doodlebug Design for Riley Blake Designs.  We just received this fabric collection and we love the fun animal prints.  Thank you for letting us share your quilts!  CLICK HERE to visit Now and Then Quilt Shop.

 Ashle Finch shared this darling Zoologie Quilt featuring the royal owls.  She created this quilt for the newest member of her extended family.  We love the navy blue sashing - it really sets off the quilt.
 We really like the different textures and patterns in the fabrics she selected.  She has a great combination of large and small prints that really work well together.  Ashle also has a shop on Etsy with pillowcase dresses. CLICK HERE to find her shop.

 Leisha took her sewing machine on vacation and spent a few relaxing days sewing up a storm.  (See her quilts below).   This cute ruffled bag was made with the A la Mode Grey fabric from the Art Gallery Modernology Collection.
 The inside fabric is from the Echo collection by Lotta Jansdotter.  The pattern is by Izzy & Ivy Designs and called the Petunia Bag.  The patterns are available in our shop.  Thanks again Leisha for sharing your talents.


Look at this darling bedding set created by Ana Pick.  We love the matching pillows.  What a wonderful project!  How lucky is this little guy.  Ana made this for her son.  
The Bermuda Whales fabric is from the Urban Zoologie Collection designed by Ann Kelle.  More pillows at the other end of the crib.  How fun.  Thank you Ana for sharing this with us.  We love it!
Another crib shot showing the coordinating fabric on the back of the bumper pads.


This fun wristlet wallet was created by Ashley.  Don't you love this bright Amy Butler fabric?  It is from Amy's Lark Collection.  Ashley has a shop on Etsy named Sparrow Designs.  CLICK HERE to see her other wristlets.  You did an awesome job centering that medallion on the fastener.

  Diana of Pretty Cool Shops created these one of a kind wristlets or clutches.  How fun to own and carry such a beautiful clutch.   We love the detail and fun pleats.  
The two wristlets above are made with the Art Gallery Poetica Collection.  CLICK HERE to visit Diana's retro shop.  Thank you Diana for sharing your talents with  us.
Karina Kayes created this Kumari Garden Rail Fence Quilt using one of our quilt kits.  Thank you Karina for sending us this picture!  We love to see our kits completed!  Your quilt turned out beautiful.  Don't you just love how cheery this quilt is?

These next few photos are projects made by Paige of Red Charlotte.  In her shop she makes and sells several different baby products that are both beautiful and functional.  Car seat cover straps to......
Baby sucking pads.  These will preserve your carrier straps.  We love the colorful tabs!

The other product she makes are the baby carrier Stuff Sacks.  I borrowed some pictures from her shop to show you how easy they are to carry.  Once you are done using your ERGObaby carrier - just put it into this easy carry bag.  This Stuff Sack was made using the Amy Butler Moonflower and Full Moon Polka Dot fabric.
CLICK HERE to visit Red Charlotte.  Thank you for sharing your creative projects with us!  We love beautiful and functional products.

Evie of Twirly Girly Couture has created this baby gift set - a stroller blanket, security blanket, burp cloths and a cute bib.    This chevron fabric is from the Remix Collection by Ann Kelle.   And......
 Have you seen the Taggie Security Blankets?  Fun little looped tabs made with various textures are sewn into the seams of blankies.  The idea is that it is creating more comfort, security, or interactive play time.  I've seen this on soft toys too.
And the Cuddle Dimple Minky makes it all the more fun to cuddle with.  So fun!  Thanks Evie for sharing your projects.   To visit Twirly Girly Couture CLICK HERE


Chevrons are hot!  We love these products created by Amanda out of the Riley Blake Chevron Fabrics.   These fabrics have been so so popular.  Great ideas and products Amanda!  Thanks for sharing them with us.  CLICK HERE for a link to Amanda's shop Amanda Jean Creations.
  

Thank you all for sharing your beautiful projects!  Keep sending us pictures.  We love to see what you are creating.

Our newest Quilt Kits!

Pow Wow!  Pattern designed by Cluck Cluck Sew.  Leisha Farnsworth selected these fabrics, pieced them together, and then quilted this fun boys quilt.  Thanks Leisha!  This has been a popular quilt all ready. We have just a few of these left!  CLICK HERE for link to this quilt.
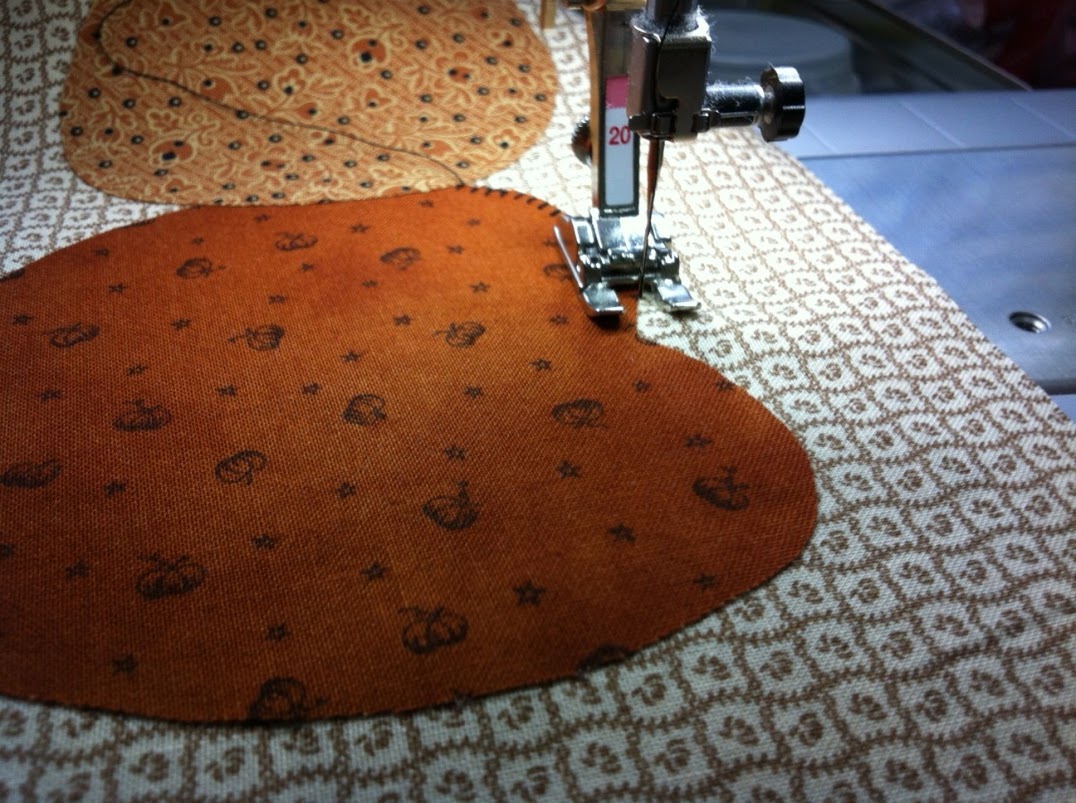
Everyone loves the colors of Autumn.  This Pumpkin Patch Quilt Pattern was designed by Kimberbell Kids and would be a perfect throw for September through November.   
We love the pieced pumpkins.  This quilt kit includes fabrics from several of our Fall Collections.  Leisha pieced and quilted this quilt.
There is even a pillow pattern - great for those left over scraps.  Link to this Quilt Kit CLICK HERE
Leisha also pieced this beautiful X's and O's quilt together.  It is a charm square quilt.  Kits will be available soon.  The wonderful fabrics in this quilt are all from the Vintage Modern Collection designed by Bonnie and Camille.  We love this quilt Leisha - awesome job!
Don't you love the large houndstooth print on the back of the quilt?  The large houndstooth prints are some of our favorites in this collection.    Let us know if you need a custom quilt kit!  All of the print squares will be precut for you.

Wednesday, August 22, 2012

The final "Home is Where the Haunt Is"


The finale Halloween "Home is Where the Haunt Is" Quilt Along

For those of you just joining in, this is our Halloween Quilt Along.  This is the finale section of this project.  This pattern was designed by Kim of Kimberbell Designs.  She has wonderful instructions and lots of pictures.  You will enjoy this pattern.  Quilt kits are available in our shop!  You will need to purchase your own personal pattern for the dimensions and specific instructions.  

This quilt pattern will boost your quilting and sewing skills!  I highly recommend it!

 The Haunted House section is one of my favorite blocks in this quilt.  I really should title this "Did I really just do that?"  You'll find out why - read on.

Just a quick photo of the fabrics in your bag for section 7.   You will also need some scraps from your previous blocks for the pumpkins.  That tiny bag is housing our buttons.  The batting, muslin, and twine are for the little sign.   Follow the pattern dimensions and instructions for sewing the background pieces together.  Pictures of background fabrics are below.
 This section was all about practicing those new skills -  Like how to press the fusible web to the right side of the fabric? NOT!  Yes!  I did that.  It upset me too because I didn't have any extra fabric in my stash like this print.  I live a couple of hours from our fabric shop so there was no way to cut another piece by today.  I would have loved for that texture to be in the windows.  
 Here you can see that I have traced all of the pattern pieces onto the fusible web paper side and pressed them to BACK side of my fabric pieces.  Yes you can see my windows will be a nice boring cream color.  If you make a mistake like this and you purchased your kit from us, just email us and we might have some extra squares for you! 
I have trimmed my applique pieces on the solid line, peeled off the fusible web paper, and laid them out on the background.  NOTE the ric rac pieces tucked under the pumpkins.  I used a little fabric glue to hold them in place.
This comes together much faster than it looks.  I used the leftover gold from the witches hatband for one of my pumpkins.  Iron your background before you lay out the applique pieces.  I did this but the camera is picking up a couple of creases in the fabric.  
 The  windows have a machine straight stitch through them.  I measured and marked the center of each window so that I had a guide to follow.  You may want crooked panes.  Notice the door has stitching as well.
Again, I machine blanket stitched the applique edges.  Lesson 2 of this project has more "how to's" on applique.  I really needed this practice.  I didn't use any freezer paper or stabilizer for this applique.  If you feel like you need it, you may want to use some.  I really don't like the tear-away brands and I don't like the added expense of the wash away brands.   Starching your background fabric also helps with your applique to prevent puckers. I really didn't have any problems with puckers on this project.   Here is a link if you want more information:  Click here
 The points - stop before the end and decide how you want to proceed.  With a right angle, it is easy to stop at the corner with the needle down and rotate your fabric.    Because I didn't want stitch overlap on the tips of the moon, I stopped before the tip about one stitch length with needle up and switched to a straight stitch.  I sewed to the end of the moon applique leaving the needle down, rotated the fabric, and sewed a couple of stitches down the other side, lifted the needle, and switched back to a blanket stitch.  
Tip close up.   Remember to sew slow and steady as you blanket stitch around those curves.  As you practice, you will learn what works best for you.  I don't like to stop and rotate on larger curves like this.  I get wonky stitches if I rotate too often.  
Close up of the pumpkins - as you can see the ric rac is tucked under the applique.  I glued these down with a tiny amount of fabric glue.  
The only thing left - to hand embroidery my little sign.  No pictures here - WHY?  Because I used fusible web to attach the square of muslin to the batting BEFORE I traced on my pattern.  Yes!  I can't believe I did that either.  

My quilt blocks all sewn together. I am loving this quilt!  Of course this is without all of the embellishments.  I will post a picture of the completed quilt as soon as it is done.  Now off to the quilter.

Happy Quilting!


Wednesday, August 15, 2012

Halloween Quilt Along continues....

Halloween "Home is Where the Haunt Is" Quilt Along

For those of you just joining in, this is our Halloween Quilt Along.  This pattern was designed by Kim of Kimberbell Designs.  She has wonderful instructions and lots of pictures.  You will enjoy this pattern.  Quilt kits are available in our shop!  You will need to purchase your own personal pattern for the dimensions and specific instructions.

This quilt pattern will boost your quilting and sewing skills!  I highly recommend it!

Today I am working on part 6 of the quilt - the pumpkin patch block.    This is a great applique practice!
Lots of pictures so I will keep the commentary to a minimum.
 Bag contents for this project.  Included are 6 orange fabrics for your pumpkins - extra to give you a choice.

 I laid the orange squares on the background to decide color placement.  My first choice was the brighter oranges but then I remembered I need to add some bright Yo-Yo's so I opted for the top placement.

Prepare applique pumpkins using the same method as in week 2 (Link click here if you need it)  REMEMBER to peel off the paper backing of the fusible web before figuring out placement.  I forgot and had to redo the placement - just when I had it perfect too.  At least I remembered before pressing! 
Pressed in place.  As you can see they overlap just a smidge. Don't you love the houndstooth print?
Begin the applique with the left pumpkin - or the pumpkin that is being overlapped.  I began stitching in the corner near the overlap so that I could blanket stitch in a continuous circle.  Stop where the next pumpkin overlaps.  Notice I remembered to use the open presser foot this time.
Pumpkin 2 - Can you see I am beginning in the corner again and I will stitch over the dark orange pumpkin.
                             
Up close shot.  This project has been great practice for me!  
Back of my applique.  I never show the back.  At the end of my applique, I raised the needle, switched to a straight stitch, and back-stitched two stitches since the end pumpkin does not have an overlap to hide or secure the end stitches.
YO-YO time!  I have never  made a yo-yo.  This is my new skill builder for the day.  First find a cup or lid to make your circle pattern!  I found a large paper cup that was the same size as my pattern - lucky me. Just trace the circle on the orange fabrics.  Again, think about color placement.  I made sure that the colors I chose would be different that the pumpkin they would be next to.  It might be fun to raid your stash and use a dark gold color.

With needle and thread, hand gather the raw edges.  I stitched close to the edge of the circle and my stitches are about 1/4 inch long.
Use the Ric Rac for the pumpkin stem.  I folded the small stem in half lengthwise and secured it in the opening of the Yo-Yo.


Oh, last but not least.  I wasn't sure what to do with the stems.  The pattern said to straight stitch them in place so I followed the edges and I have a little triangle in each one!
Please send us pictures when you are finished.  Some are coming in now!  We will post them soon.
Happy Quilting!