Wednesday, May 29, 2013

APPLE PIE IN THE SKY QUILT ALONG BLOCK 7

Basket of Flowers


Basket of Flowers is a 5 patch block.  Which means there are 5 patches across and down. Because we are making a 12" finished square, I had to tweak this one just a bit.  You will notice that the Cherry Tablecloth patch is just a little wider than the other red/white half-square triangle patches. When it is finished, it will only be 1/4" larger.   
You can choose to have the flower section all different prints, the same, or in rows like I did.  Let's get started!

Cutting Instructions:

  • Cut 1 large green (your basket fabric) triangle with sides measuring 8" each.  You can place the corner of your fabric at the corner of your mat, and using your ruler, cut from 8" high to 8" wide on the diagonal.  Or you can cut an 8" square and then diagonally cut it in half making a triangle.
  • Cut 1 green square for the basket base measuring 3 3/8" square, then cut on the diagonal
  • Cut 1 large background (cherry fabric) triangle with sides measuring 5 7/8".  
  • Cut 2 rectangles of background (cherry fabric) measuring 3" x 7 3/4"
  • Cut 6 assorted flower (red fabric) squares measuring 3 1/4" square.  If you want to have different fabrics in each row, you will need 1 square of one fabric, 1 square of another fabric, and 2 each of the other two fabrics. 
  • Cut 7 white or background squares measuring 3 1/4" square

 We will work on the flowers first.  If you are going to have different fabrics in each row, then you will need to cut your squares in the following manner.  You will need to cut fabric square 1 on the diagonal, using only 1 triangle.  Leave fabric 2 in the full square.  For fabric three, leave one square the full size and cut the 2nd square on the diagonal.  For the fourth fabrics you will need the two full 3 1/4" squares.
For the white or background squares, you will need to have 4 full squares and 5 triangles. Cut 3 white squares on the diagonal.  Match them up with the print (red) triangles and set 3 aside.  You will have one extra triangle for another project.   Draw a diagonal line on the 4 full squares.   Match those squares up with the print squares.
Make the flower half-square triangles.   With right sides together, sew the triangles together to form a square with 1/4" seam.   For the full squares, you will make half-square triangles. Sew a 1/4" seam along each side of the the drawn pencil marking.  Cut squares along the pencil line.  Press half-square triangles open with seams to the dark print.  The half-square triangles should measure 2 7/8" square.
 Lay out the half-square triangles in rows.  Place a white background triangle to the left of rows 2-4.
 Sew the half-square triangles and triangles together in rows.  Match the corner, right angle, of the triangle even with the top of the last half-square triangle.


Press the seams of each row in alternate directions.  This way there will be less bulk in your seam.
Trim of dog ears.   You should have enough white background fabric in the center for 1/4" seam.  If you have a little extra, you can trim this off - but be careful since you need a seam for the basket.

With right sides together, center the larger basket triangle with the angled side of the block.  The edges will extend beyond pieced square. Pin to hold in place.
Flip the square over and sew the seam on the pieced half-square triangle side so that you can watch those half-square triangle points.
Press the seam towards the large basket triangle.  Your block should now measure 10" square.  Square up your block, trimming the basket triangle if you need to.  You shouldn't need to trim much!
Sew the 3 3/8" green triangles to the ends of the 3" x 7 3/4" rectangles, matching up the straight edges.  Press seams towards the triangles.
Lay out the block and sew the strips to the bottom of the block.  The basket stand seams will overlap.
Trim off the dog ears.  Even out the seam if you need to but don't trim too much off.
Sew the remaining triangle to the bottom corner of the block.  Center it in the same manner you did with the green basket triangle.   Press seam towards the triangle.  You will have a little extra to trim off the sides.  Square up your block.  Your block should now measure 12 1/2" square!


And there you have it!  The Basket of Flowers Block!


Now for the fun


Congratualtions to  Jeanenne Nielsen!

Winner of a $10 gift certificate to Sisters & Quilters! 

I keep trying to capture the random number generator and publish it but it won't let me.  It shows up blank.  The number drawn this week was #2.


 Ansje's Bear Paw

Jeanenne's Bear Paw

Leisha's Bear Paw

 Leisha's Yankee Puzzle

And Leisha's Clay's Choice Block!

 Thank you everyone for sending in your pictures!  If there is anyone else out there, please send me your pictures and I will put them here.  Even if you are just beginning....send them in!


You know I keep looking at some of these blocks thinking that they would make a great quilt on their own.  Here is a sneak peak of what I have been doing with the Broken Wheel (I am going to rename this block!)


  Happy Sewing!

Wednesday, May 22, 2013

APPLE PIE IN THE SKY QUILT ALONG BLOCK 6

THE BEAR'S PAW

One of my favorite traditional blocks.  And much easier than it looks.  You will enjoy sewing this block.  This block is considered a 7 Patch block - we are going to tweak the center patch just a bit to create a 12" block.  
We are going to learn a new way to make half-square triangles.  This is a better method than the one we used in Clay's Choice - we made a seam all around the outside of a square remember?  This method is best because the cut squares are not on the bias and you get 8 half-square triangles from two squares.  If you need several half-square triangles - this is the method you want to use.  Let's get started.

Cutting Instructions:

  • Cut 4 white squares 2 1/4" x 2 1/4"  (I know I left them out of the picture)
  • Cut 2 white squares 5 1/4" x 5 1/4"
  • Cut 4 white rectangles 2" x 5 3/4"
  • Cut 2 red/print squares 5 1/4" x 5 1/4"
  • Cut 4 yellow (or your print) squares 4" x 4"
  • Cut 1 red  (or your print) patch for the very center square 2" x 2"


More drawing :)  This time draw two diagonal lines on the wrong side of the white 5 1/4" squares, crossing in the center.  
 Match up the 2 white 5 1/4" squares with the 2 red/print 5 1/4" squares, right sides together.
 Stitch a 1/4" seam along each side of the two pencil lines.  Press flat. Click on the picture for a better view.
First cut the square into four squares.   With your rotary cutter and ruler, make a vertical cut right down the center (at the 2 5/8 mark) of the square.  Then without moving the squares, make another cut horizontally through the center - again at the 2 5/8" mark.  You should have four 2 5/8" squares.  DON'T SEPARATE THEM.  I pulled them apart just a little so that you could see the cuts.
 Next make diagonal cuts RIGHT ON the pencil lines that you made. Walaaaa!  You now have 8 half-square triangles per large square.  Press each half-square triangle open, with the seam towards the print. Trim the dog ears.  Each half-square triangle should measure 2 1/4" square.
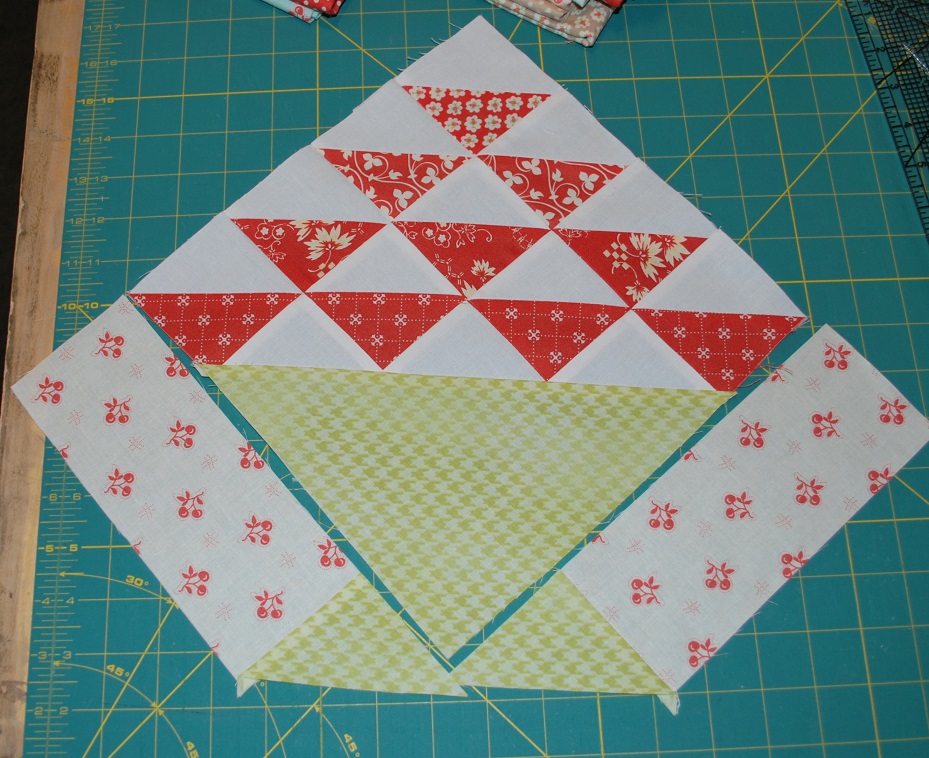
 Assemble the "paw" first.  Make sure the triangles are in the correct direction.
 Stitch one white 2 1/4" square to a half-square triangle.  Add another half-square triangle.  Just like row one. Press seams towards the white square.
Next sew two half-square triangles together making a vertical row as seen in the lower left.  Press the seams towards the top.

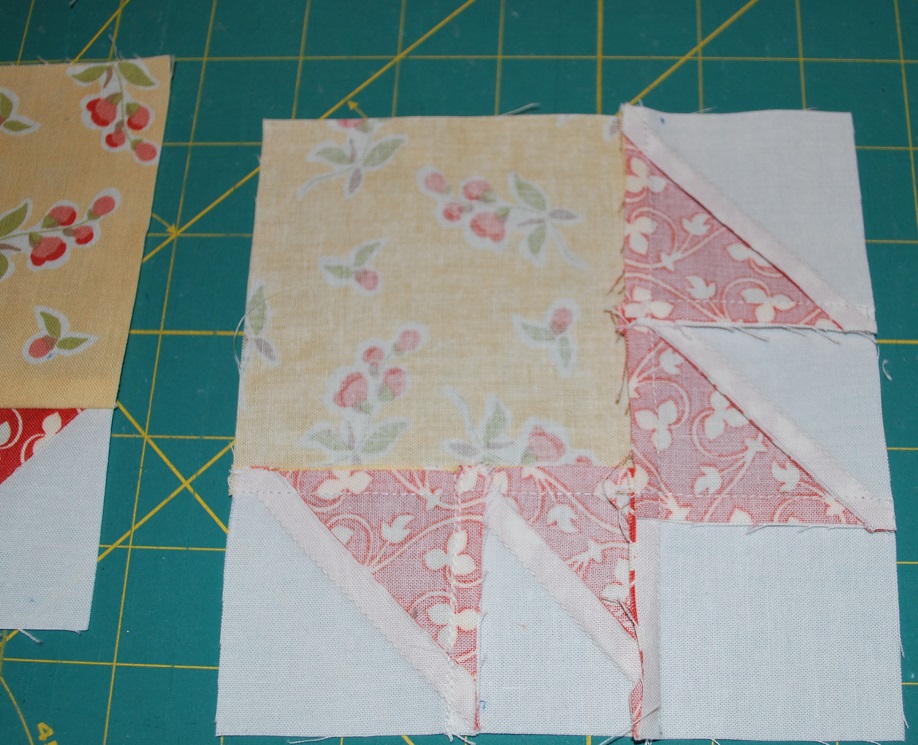
 Sew the vertical row of two half-square triangles to the 4" print square.  Press the seam to the print square.
 Add the top row.   Press the seams towards the larger print square.  Each "Paw" patch should measure 5 3/4" square.
 It is a brave girl that lets you see the back of her quilt square.    Sew 3 more "Paw" patches.  Make sure you watch the placement of the half-square triangles.  It is easy to turn them around.
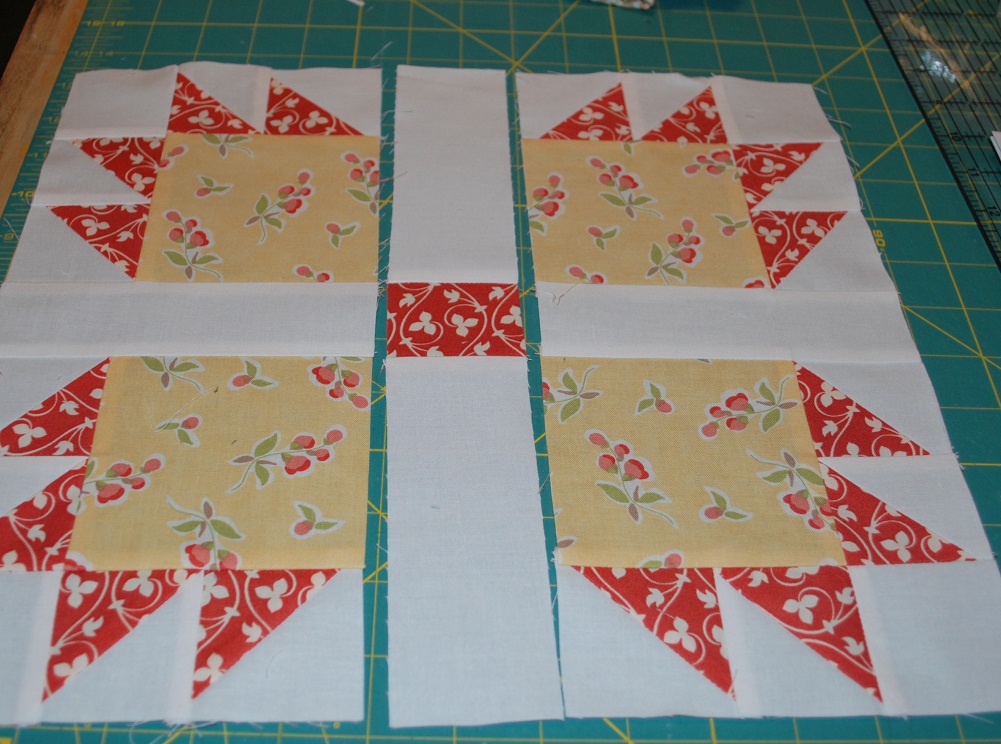
Arrange the "Paw" patches into the Bear's Paw block.  Add the white rectangles and center square.
 Stitch the units together in rows matching center seams.  Press the seams towards the rectangle patches.  note - The center print square seams are pressed towards the top of the block and the bottom.

And there you have it..... THE BEARS' PAW
 So what did you think?  Much easier than it looks?   I love this block!

 Now for the fun

Congratualtions to Ansje in Oregon

winner of a $10 gift certificate to Sisters & Quilters!  

Thank you all for sending me your pictures during the week.  It was so fun to receive them.  Keep them coming.  I know we have some new quilters that just joined up.  Send your pictures to sistersandquilters@gmail.com
I use the Random Number Generator to pick the winner each week.  This week the number was 3 and Sandra and I don't count. 


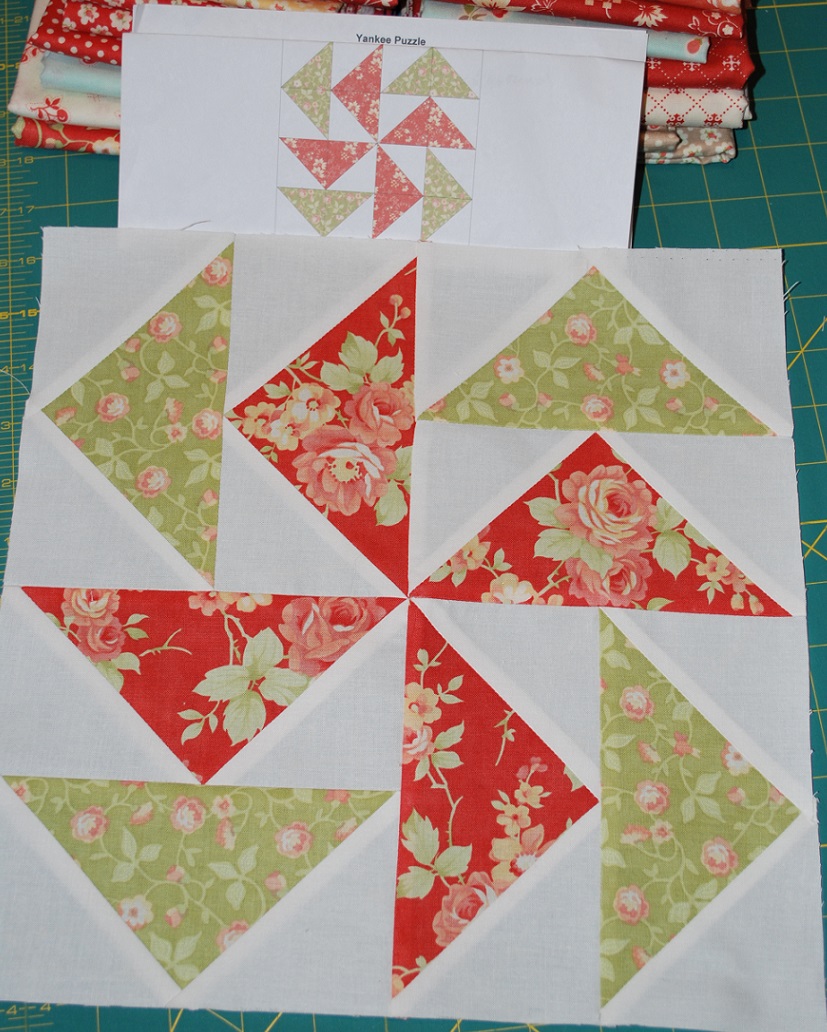
Your blocks....last week's Yankee Puzzle

 Colleen's Willow block - love the grey dots.  Yellow and grey has been really big this year.

 Jeanenne's from the PB&J Collection.  One of these week's we need to take a picture of all of our blocks we have made so far.  I can't wait to see these blocks in a quilt.  So fun.

Sandra's block with a little La Belle Fleur with those reproduction prints.  Beautiful.


 Ansje in Oregon is joining us.  Welcome Ansje!  Her blocks are from Mary Englebreit prints.  Love love this Apple Pie Block.  
 Ansje's Broken Wheel
  Clay's Choice

And Yankee Puzzle.  Thank you Ansje for sharing these with us.  It was so fun to receive pictures throughout the week.  Love these.  Such cheerful prints.  

Have a wonderful and safe holiday weekend!  Happy Sewing!

Wednesday, May 15, 2013

APPLE PIE IN THE SKY QUILT ALONG BLOCK 5

Yankee Puzzle

 This block will sew up quickly.  Especially since you know how to make flying geese four at a time.  The original pattern called for all half-square triangles.  But I decided to get ride of at least 8 seams for you.  If you are making a scrappy Yankee Puzzle and you want to make half-square triangles, I have included some instructions at the end.
 Cutting instructions:

  • Cut one square from a print 7 1/4" x 7 1/4"
  • Cut one square from another print 7 1/4" x 7 1/4"
  • Cut 8 background squares 3 7/8" x 3 7/8" 

 With a pencil, draw a diagonal line on the wrong side of each 3 7/8" background square.
 This is the same flying geese technique from Block 1, except larger.  Place a 3 7/8" background/white square on the corner of one of the print 7 1/4" squares.  Place another 3 7/8"square on the opposite corner overlapping the points in the center.  Pin in place if needed.
 Stitch a 1/4" seam along each side of each pencil line from corner to corner.  Yes, right through the overlapping squares.  Just click on the picture if you need a closer look.
 Using your rotay cutter and ruler, cut on the pencil line separating the two units.  Press the seams towards the  white triangles.


Place another white square in the corner or point of the heart shaped unit.  The diagonal line is vertical.  Stitch a 1/4" seam along each side of the pencil line.
 Using a rotary cutter and ruler cut along the pencil line.  Press the seams towards the white or background triangles.
Trim of the dog ears.  True up the rectangles to 3 1/2" x 6 1/2".  There will not be much to trim off.  Make sure those diagonal seams in the corners are centered.

 Lay out the flying geese units in the order that you want them.   Sew one red flying geese unit to one green flying geese unit. The red will be at the base of each unit.  You will have 4 units of two flying geese measuring 6 1/2" square.  Press all seams towards the top green unit.
Again lay each unit out forming the block design. Sew two units together forming a row.  Press seams towards the bottom of the red flying geese triangle.  Sew the two rows together, nestling center seam.  Press center seam to either side.
And there you have it...............  Yankee Puzzle


Note:   If you want a more scrappy look and want to make the half-square triangle units, here are the directions.  Cut 8 print squares and 8 background squares measuring 3 7/8" x 3 7/8".   Sew them together using the half-square triangle method we used in the Whirpool Block CLICK HERE.  Arrange squares in the Yankee Puzzle pattern above and stitch them together in rows.

Now for the fun

Congratualtions to  Jeanenne Nielsen

winner of last weeks block submission drawing!  


 Jeanenne Nielsen's Clay's Choice Block - love that red print!

 Sandra's Clay Choice - great combo

Colleen Fifield's Broken Wheel.  Love the Noteworthy gray in the center.

 Another block from Colleen - her Clay's Choice.  Colleen I love that stripe and polka dot together!


My Christmas Clay's Choice Block 

And your block will go here.........please send it to me!  Even if you are just beginning and are on block 1 we want to see it!  Send your pics to sistersandquilters@gmail.com


Happy Sewing!